
UA300 Fingerprint Attendance System - Installation Guide | ByteFlow Dubai
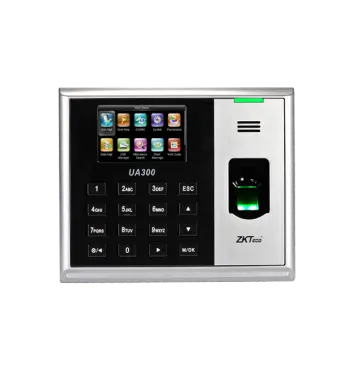
Install your UA300 in just 20 minutes.
The UA300 is a reliable, affordable fingerprint attendance machine designed for businesses across Dubai. This guide walks you through everything from unboxing to daily use, so you can get your device up and running fast.
What Is the UA300?
The UA300 is a fingerprint attendance machine built for tracking employee time and attendance. It's fast, accurate, and simple enough for any office, factory, school, or hospital to set up without IT support.
Capacity:
Stores up to 3,000 fingerprints
Stores up to 100,000 attendance records
Why Choose the UA300?
FeatureBenefit Fast Verifies identity in under 1 second accurate 99.9% fingerprint matching accuracy easy to use Simple 3-inch touch screen interface connected Supports WiFi and USB affordable Best value fingerprint attendance system in Dubai
Ideal for: Offices, factories, schools, and hospitals with 10–500 employees.
What's in the Box
UA300 Device
Power adapter (5V)
Network cable
Mounting screws
ZKTime.net 3.0 software
1-Year Warranty
Installation Guide: 3 Simple Steps
Step 1: Mount the Device (5 minutes)
Where to install:
Indoor location only
Mount at a height of 4–5 feet from the floor
Position near a power socket
Position near your WiFi router
How to mount:
Mark 4 screw holes on the wall
Drill and insert wall plugs
Screw in the mounting bracket
Hang the UA300 device on the bracket
Connect the power cable
The device will turn on automatically once powered.
Step 2: Connect to the Network (5 minutes)
On the UA300 screen:
Press MENU
Enter the default password:
123456Navigate to: Settings → Network → TCP/IP
Enter your network details:
IP Address:
192.168.1.201Subnet:
255.255.255.0Gateway:
192.168.1.1
Press OK, then connect the network cable
Test the connection: Type the device's IP address into a web browser. If the page opens, the connection is working.
Step 3: Set Up the Software (10 minutes)
Install ZKTime.net 3.0:
Download the software from ZKTeco
Run the installer on your Windows PC
Click Next → Next → Install
Open ZKTime.net 3.0
Add your device:
Click "Add Device"
Enter the device details:
Name: Main Gate
IP:
192.168.1.201Port:
4370
Click "Test" it should display "Connected"
Click Save
Done! Your device is ready to use.
How to Add Employees
Method 1: Directly on the Device (Quick)
MENU → Users → Add New
Enter ID:
001Enter Name: e.g., Ahmad Khan
Place finger on the scanner 3 times
Done!
Method 2: Using the Computer (Best for large teams)
Open the ZKTime.net software
Click "Add Employee"
Fill in ID, Name, and Department
Click "Register Fingerprint"
Have the employee place their finger 3 times
Click "Download to Device"
Daily Use
How Employees Mark Attendance
Place finger on the scanner
Wait for the beep
Screen displays "Thank You"
Done in under 1 second!
How to Check Attendance Records
Open ZKTime.net
Click "Upload from Device"
Go to "Attendance Records"
Select your date range
Export to Excel
Available reports:
Daily attendance
Late arrivals
Early leaves
Monthly summary
Overtime hours
Important Settings to Configure
Set Working Hours
Software → Shifts → Add Shift
Enter:
Name: Morning Shift
Time: 9:00 AM – 5:00 PM
Grace period: 15 minutes
Assign the shift to employees → Save
Enable Auto Backup
Settings → Auto Upload
Turn ON
Set Interval: Every 1 hour
Save
Your data will now upload automatically.
Troubleshooting: Common Problems & Fixes
❌ Device Not Connecting
Check that the network cable is plugged in
Ping the device: open CMD and type
ping 192.168.1.201Restart the device and router
Confirm your firewall allows port 4370
❌ Fingerprint Not Reading
Clean the sensor with a soft cloth
Dry your finger before scanning
Press your finger flat and firm on the sensor
Try a different finger
Re-register the fingerprint if the issue continues
❌ Data Not Showing
Click "Upload from Device" manually
Check that the device's date/time is correct
Restart the ZKTime.net software
Clear old records if the device memory is full
❌ Forgot Admin Password
Press Menu 5 times quickly
Enter the master password:
888888Reset your password
Maintenance Tips
Every Week:
Clean the fingerprint sensor
Verify data is uploading correctly
Every Month:
Backup data to an external drive
Delete records older than 6 months
Check for software updates
Keep your sensor clean for better performance.
Frequently Asked Questions
Q: Does it work without internet?
Yes, The UA300 stores data locally and uploads automatically once your internet connection returns.
Q: How many fingers should be registered per person?
We recommend registering 2 fingers per person as a backup.
Q: Can it use RFID cards?
Yes,An optional card reader is available.
Q: Does a power cut affect saved data?
No,All data is saved permanently in the device's memory.
Q: Does it work with payroll software?
Yes,You can export attendance data to Excel or CSV format for use with any payroll system.
Q: What's the warranty coverage?
The UA300 comes with a 1-year full warranty, including free replacement if defective.
Get Support
ByteFlow Authentic Guide & Support Provider
Call/WhatsApp: +971 54 328 2042
Email: info@byteflow.ae
Website: www.byteflow.ae
Support Hours: Mon–Sat, 9 AM – 6 PM
We provide:
Phone support
Remote assistance
How we can help with this
Have an IT problem you need solved?
Reading about it is one thing. Getting it fixed is another. Our team responds within 2 hours.